Full submitted version of Abridged Published IB World Magazine Article, May 2007
Promoting the Learner Profile @Your School
Posted on September 12, 2012
I was going to call this blog post, Create a Student Content Generated Learner Profile Website for Your School
But that sounds way academic and I want people to actually read this.
If you are a PYP, MYP, DP (or any combination of the three) school then you know all about the Learner Profile. What I am here to share with you is how to:
- empower your students to show off what they know about it digitally online
- showcase their developing understandings
- further develop collaboration skills
- learn important digital-age creation & communication skills as a means of furthering their understanding this important aspect of your school’s programme
Set up a Weebly Pro account. With this you can create a learner profile website shell where students can upload videos, photographs, scans of their work, embedded documents, slide shows, or just plain old text based reflections.
In our case at Doshisha International School, Kyoto (DISK) we have devised it so there is a pretty standard Home page and a page for every one of the attributes. Take a look here at our learner profile @DISK site. We are just getting underway here in September of 2012.
Step 2
Create a chart like this to start your class to see where students would like to begin sharing:
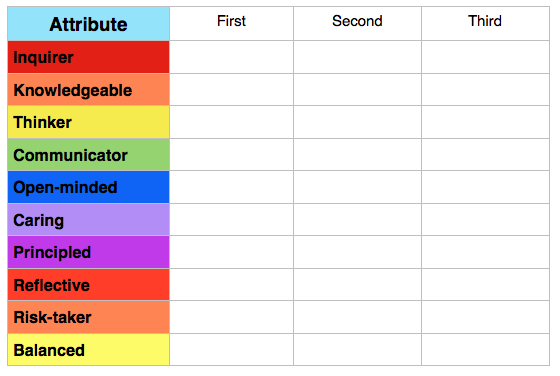
Ideally, in an introductory session, students will know well in advance about the opportunity to do this (it may become a regularly scheduled event?) and come prepared to capture or create something digitally to upload and explain.
With Weebly, I have learned, there can only be one editor to a page at a time.Using student email accounts assign permissions using a hard copy of the chart, students can work collaboratively if need be at this point or can start typing up their explanations for cutting/pasting once they take the wheel. I have found that it can be easier to place an attribute title on the computers and then students can move about the room once they have become accustomed to the style of the session and things start running smoothly.
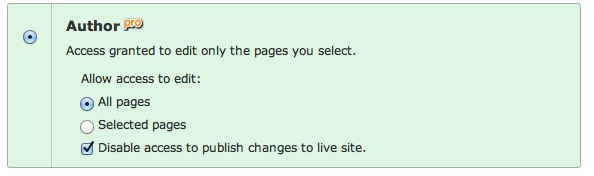
NOTE: You want to set up the permission so that students can upload but not self-publish. I spend some time after each opportunity to make sure my formatting remains intact.
With Weebly, I have learned, there can only be one editor to a page at a time.Using student email accounts assign permissions using a hard copy of the chart, students can work collaboratively if need be at this point or can start typing up their explanations for cutting/pasting once they take the wheel. I have found that it can be easier to place an attribute title on the computers and then students can move about the room once they have become accustomed to the style of the session and things start running smoothly.
NOTE: You want to set up the permission so that students can upload but not self-publish. I spend some time after each opportunity to make sure my formatting remains intact.
Step 3
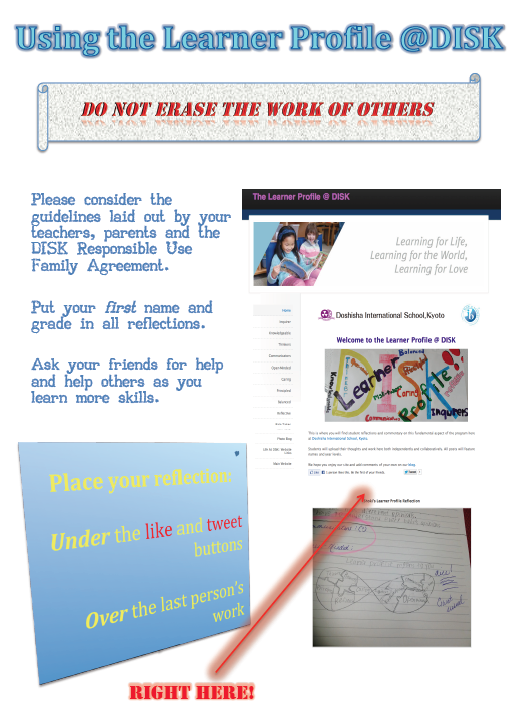
Create and share a document like this to go through with the class and maintain the look of your new site. It is important that students understand about NOT deleting the work of others and always placing their work at the top of the page, under the header or any other items you want to remain prominent (like, say, a short explanation). As you can see from the example, I also want to keep the tweet and Facebook like buttons near the top as I anticipate loooooooooooong pages.
Create and share a document like this to go through with the class and maintain the look of your new site. It is important that students understand about NOT deleting the work of others and always placing their work at the top of the page, under the header or any other items you want to remain prominent (like, say, a short explanation). As you can see from the example, I also want to keep the tweet and Facebook like buttons near the top as I anticipate loooooooooooong pages.
As we just got started and writing this now I am wondering if I may not need to add archive pages as things progress.
Step 4
If you haven’t already, have the conversations about collaboration not being cheating but the way the real learning and creativity often works (remix/copyright blog post link) and encourage everyone to share and teach each other. I always make a point of sharing how I usually learn something new from students in these sessions and how learning how to learn and share is often more important than the ability to use software X. (See more about Connectivism here)
Once you are ready-to-go and things get moving you will have loads of questions to answer and teachable moments. Great. The real excitement starts once everyone has been “infected” and you start having nodes of expertise formed. Before you know it you are sitting back and taking notes for progress reports about how well the students are cooperating, collaborating and taking responsibility for more self-directed learning.
I personally use some of this time to upload a few photos, comments and tweets to the other school web sites to keep parents informed and, hopefully, reinforcing conversations happening at home.
An Aside
We are setting up a mentoring system by which CAS (creativity, Action, Service) students in the MYP can help students access the site and learn new skills at specifically scheduled times, encouraging them to take greater personal responsibility for their work as well.
The are plenty of ways to go. For our debut we have decided to make the pages open to all grade levels. You could organize your site into sections of the school, year levels, whatever. I would also mention that we chose this platform over a wiki as I want greater control over how to present the material.
But Wait! There’s more… The ISTE NETS for Students
If you area serious about technology learning outcomes and you haven’t already you should check out the International Society for Technology Education and their National Education Technology Standards and read this.
5. Digital Citizenship Students understand human, cultural, and societal issues related to technology and practice legal and ethical behavior.Students: a. advocate and practice safe, legal, and responsible use of information and technology b. exhibit a positive attitude toward using technology that supports collaboration, learning, and productivity
6. Technology Operations and Concepts Students demonstrate a sound understanding of technology concepts, systems, and operations. Students: a. understand and use technology systems
The ISTE NETS and Performance Indicators for Students (NETS•S)
Copyright © 2007, ISTE (International Society for Technology in Education) 1.800.336.5191 (U.S. & Canada) or 1.541.302.3777 (Int’l), [email protected], www.iste.org.
If you have any comments I’d love to here them!
Step 4
If you haven’t already, have the conversations about collaboration not being cheating but the way the real learning and creativity often works (remix/copyright blog post link) and encourage everyone to share and teach each other. I always make a point of sharing how I usually learn something new from students in these sessions and how learning how to learn and share is often more important than the ability to use software X. (See more about Connectivism here)
Once you are ready-to-go and things get moving you will have loads of questions to answer and teachable moments. Great. The real excitement starts once everyone has been “infected” and you start having nodes of expertise formed. Before you know it you are sitting back and taking notes for progress reports about how well the students are cooperating, collaborating and taking responsibility for more self-directed learning.
I personally use some of this time to upload a few photos, comments and tweets to the other school web sites to keep parents informed and, hopefully, reinforcing conversations happening at home.
An Aside
We are setting up a mentoring system by which CAS (creativity, Action, Service) students in the MYP can help students access the site and learn new skills at specifically scheduled times, encouraging them to take greater personal responsibility for their work as well.
The are plenty of ways to go. For our debut we have decided to make the pages open to all grade levels. You could organize your site into sections of the school, year levels, whatever. I would also mention that we chose this platform over a wiki as I want greater control over how to present the material.
But Wait! There’s more… The ISTE NETS for Students
If you area serious about technology learning outcomes and you haven’t already you should check out the International Society for Technology Education and their National Education Technology Standards and read this.
- Creativity and Innovation Students demonstrate creative thinking, construct knowledge, and develop innovative products and processes using technology. Students: b. create original works as a means of personal or group expression
5. Digital Citizenship Students understand human, cultural, and societal issues related to technology and practice legal and ethical behavior.Students: a. advocate and practice safe, legal, and responsible use of information and technology b. exhibit a positive attitude toward using technology that supports collaboration, learning, and productivity
6. Technology Operations and Concepts Students demonstrate a sound understanding of technology concepts, systems, and operations. Students: a. understand and use technology systems
The ISTE NETS and Performance Indicators for Students (NETS•S)
Copyright © 2007, ISTE (International Society for Technology in Education) 1.800.336.5191 (U.S. & Canada) or 1.541.302.3777 (Int’l), [email protected], www.iste.org.
If you have any comments I’d love to here them!
From right here at WAB!
They do good work..
Click the image to check it out.
Click the image to check it out.